
Zerodha Kite For PC
Zerodha Kite App PC is now available for Windows 10/8/7/11 (32-bit/64-bit). Download Zerodha Kite App For PC and Start inverting on PC or Laptop Now.

Zerodha Kite For PC - Trade & Invest
Zerodha Kite is a cutting-edge online trading and investment platform developed by Zerodha, one of India’s leading stockbroking companies. Available as both a web application and a mobile app, Zerodha Kite empowers investors to trade across various segments, including the stock market, derivatives, currencies, and commodities.
Using Zerodha Kite is straightforward and user-friendly. It offers a range of features such as portfolio management, seamless stock buying and selling, advanced charting tools, in-depth analysis, order tracking, and much more. Renowned for its speed and efficiency, Zerodha Kite has become one of the most trusted and widely used trading platforms in India.
In this guide, I will walk you through the process of using Zerodha Kite on a PC with the help of an emulator. This step-by-step tutorial is designed to simplify your trading experience and help you make the most of this powerful platform.
System Requirements
| Minimum | Recommended |
|---|---|
| Requires a 64-bit processor and operating system | Requires a 64-bit processor and operating system |
| OS: 64-bit Windows 7, Windows 8.1, Windows 10, Wwindows 11, MacOS | OS: 64-bit Windows 10, Windows 11, MacOS |
| Processor: Intel Core i5-4430 / AMD FX-6300 | Processor: AMD Ryzen 5-1600 / Intel Core i5-7600K |
| Memory: 8 GB RAM | Memory: 16 GB RAM |
| Graphics: NVIDIA GeForce GTX 960 2GB / AMD Radeon R7 370 2GB | Graphics: Nvidia GTX 1060 6GB or better |
| DirectX: Version 11 | DirectX: Version 11 |
| Network: Broadband Internet connection | Network: Broadband Internet connection |
| Storage: 30 GB available space | Storage: 30 GB available space |
Zerodha Kite For Windows 10 PC
To use the Zerodha Kite app on Windows 10, start by downloading and installing the BlueStacks emulator. You can either visit the ![]() BlueStacks official website to download the setup file or extract the .exe file from the provided zip folder. Once installed, launch BlueStacks and sign in using your Google account to access the Google Play Store. Inside the Play Store, search for the Zerodha Kite app and install it directly, or you can install the app using the .apk file available in the setup zip folder.
BlueStacks official website to download the setup file or extract the .exe file from the provided zip folder. Once installed, launch BlueStacks and sign in using your Google account to access the Google Play Store. Inside the Play Store, search for the Zerodha Kite app and install it directly, or you can install the app using the .apk file available in the setup zip folder.
After completing the installation, the Zerodha Kite app icon will appear on the BlueStacks home screen. Click on the icon to open the app and log in using your Zerodha account credentials. With this setup, you can conveniently run the Zerodha Kite app on your Windows 10 computer and access all its features in a desktop environment.
Zerodha Kite For Windows 11 PC
If you're a Windows 11 PC user, you can easily run the Zerodha Kite app on your system by following the same steps mentioned for Windows 10. The process is quite similar, and with Windows 11’s enhanced compatibility, you can expect a seamless experience while using the Zerodha Kite app for all your trading needs. Simply follow the instructions provided, and you'll be up and running in no time!
Zerodha Kite For Windows 7 PC (32 bit / 64 bit)
If you prefer to use the Zerodha Kite app on a Windows 7 32-bit or 64-bit architecture, you can simply visit https://kite.zerodha.com and log in to your Zerodha account. Through the web browser, you can access all the features available on the app, making it a convenient option that works seamlessly on any Windows PC without requiring additional software installation.
However, if you are more comfortable using the Zerodha Kite app itself, you can run it through the BlueStacks emulator. Before proceeding, ensure that your Windows 7 PC is capable of running the emulator smoothly to avoid performance issues.
But, luckily we have two method to Run Zerodha Kite on Windows 7 PC (32 bit and 64 bit).
- Run Zerodha Kite with BlueStacks Emulator
- Use Zerodha Kite without Emulator
With this Method you can Run and use Zerodha Kite in Windows 7 PC (32 bit / 64 bit) inlcuding Windows 10, 11 and 8 PC.
Zerodha Kite For MAC
Since Zerodha Kite doesn’t have a native macOS app, you’ll need to use an Android emulator to run it on your Mac. The best option is BlueStacks, a reliable and user-friendly emulator that works seamlessly with both macOS and Windows. Steps to Install Zerodha Kite on Your MacBook:
- Download BlueStacks: Start by downloading the BlueStacks setup wizard, which includes the BlueStacks .dmg file along with the Zerodha Kite APK.
- Install BlueStacks: Open the downloaded .dmg file and follow the on-screen instructions to install BlueStacks on your Mac.
- Upload the Zerodha Kite APK: Once BlueStacks is installed, launch the emulator. Next, upload the Zerodha Kite APK file into BlueStacks.
- Complete the Setup: Follow the on-screen prompts within BlueStacks to finish the installation.
In just a few simple steps, you'll be able to run Zerodha Kite smoothly on your Mac, just like you would on an Android device.
Run Zerodha Kite With BlueStacks Emulator
In this method, we are using BlueStacks Emulator for Zerodha Kite on Windows 10 PC. If you wish to Play Zerodha Kite on Windows 7, 8, 10 or 11 without an Emulator then go to our previous post and follow them.
Install BlueStacks Emulator on Windows 10 PC
Here are the steps to download and install BlueStacks on PC:
- Go to https://www.bluestacks.com/download.html and install the latest version of BlueStacks.
- After downloading, install and run the .exe file of BlueStacks Emulator.
- When Installation is complete then BlueStacks will Launch Automatically.
- Now you are ready to use BlueStacks Emulator.
Now you need to set up Google Play Store in BlueStacks to Install Zerodha Kite.
1.Run Bluestacks and Open Google Play Store app. Setup Google Account into them.

2.Search for Zerodha Kite app and Install the app.

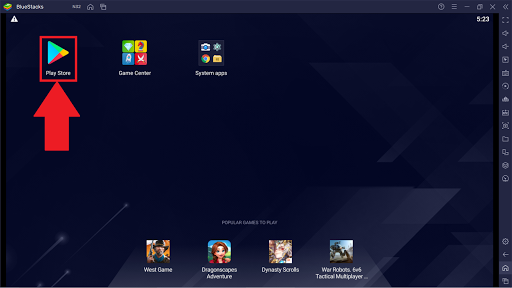
3.You can see the Zerodha Kite app has been installed on Your PC and reflecting on BlueStacks Dashboard as shown in the image. Now you can use Zerodha Kite on Your PC.
Zerodha Kite For Windows 7 PC (32 Bit) Without Emulator
For this method, You need a Android Device and Windows 7 PC (32 bit) or any other variants. Then, Follow below steps:
- Go to http://www.sigma-rt.com/en/tcgames/ and Install TC Games App on Windows and for Android.
- Open Android Settings and Go to Developer options.
- Turn on Developer options and you will see USB Debugging.
- Turn on USB Debugging.
- Open TC Games software on Windows 7 PC.
- Then, open the TC Games app on Android.
- Now, connect Android device to Windows PC via USB Data Cable.
- You will see a permission popup that looks like this:
- Click on the OK button to run the TC Games.
- Now, tap on connect in PC.
- Connection process has been started. Wait for establishing the connection.
- Now, use Zerodha Kite on Windows 7 PC (32 Bit)
- Click on Full-Screen Mode and Play Zerodha Kite with Android Mirroring.
Disclaimer
Let us tell you that this website is not the official website of Zerodha Kite app. This website does not have any relation with this app and its developer. We only publish tutorials and content related to downloading and using it. If you have any objection to the content present on this website, then you can contact us. Click Here to Contact. We will reply to you within 48 hours. Thank you for your cooperation. We appreciate you.
